Maurizio Bonani • 30 Oct 2020
Using Laravel Livewire To Create a Setup Wizard For SendPortal
What is Livewire
Livewire is a full-stack framework for Laravel, built by Caleb Porzio, that helps to build dynamic interfaces in a simple way, without leaving the comfort of Laravel.
Livewire smooths the complexity of client-server code integration, allowing Laravel developers to build dynamic UIs without having to reach tools for front end tools like React or Vue, and without having to implement a dedicated API for backend communication.
How does Livewire work?
With Livewire, HTML is rendered using Blade on the server side, but when a change is detected on the client a roundtrip AJAX request is made to the server that returns only the newly rendered DOM fragment as HTML. Livevewire then uses DOM diffing to know which HTML to replace with the new data.
GitHub uses this concept for some parts of its UI, but LiveWire is heavily inspired by Elixir's Phoenix LiveView, which leverages native WebSockets instead of AJAX.
What is Sendportal
Sendportal is an open-source self-hosted email marketing application, using the Laravel PHP framework.
It allow users to manage their own newsletters at a fraction of the cost of other options, and offers integrations with several email providers, including AWS SES, Mailgun, Sendgrid, Postmark and Mailjet.
Creating an Installer
Until a few weeks ago, the recommended way to install Sendportal was to make use of an Artisan command - php artisan sp:setup.
The command performs the following:
- check that the
.envfile already exists, otherwise create it - check that the application key has been set
- check that the application url has been set and is different than
localhost - check that the database connection is valid, otherwise prompts for valid credentials
- check that the migrations are up to date
- finally, prompt for the creation of the first admin account
Whilst this works really well, some users prefer the comfort of a GUI setup. This would also help Laravel Vapor users, who do not have access to the command line.
Our options were to either:
- use a frontend framework (like React or Vue) - but that would entail additional complexity (both in development and maintenance); or
- use regular Blade views and controllers - but that would not give us the front end reactivity that we were looking for
Since LiveWire is gaining popularity, we thought that it would be a good opporunity to see if it (and we!) were up to the task. In all honesty, we were attracted by the idea of not having to write any JavaScript code. Not that we have anything against Javascript per se, but as SendPortal is a self-hosted project, we want to keep things as simple as possible.
Initial Steps
Livewire is a PHP package, and is easily installed using Composer:
$ composer require livewire/livewireNext we have to add the route which displays the setup page, so that it can be reached via the /setup url.
Route::view('setup', 'sendportal::setup.index')->name('setup');Now we can go ahead and create the view, where LiveWire scripts and styles can be injected
@extends('sendportal::layouts.app')

@section('title', 'Application Setup')

@push('css')
    @livewireStyles
@endpush

@section('content')

<div class="container">
    <div class="row justify-content-center">
        <div class="col-md-8">
            @include('sendportal::auth.partials.logo')

            {{-- Here we will render the LiveWire component --}}
        </div>
    </div>
</div>

@endsection

@push('js')
    @livewireScripts
@endpush
Now you can run the following command in your terminal to generate the Livewire component:
$ php artisan make:livewire setupThis command creates two files app/Http/Livewire/Setup.php and the corresponding view resources/views/livewire/setup.blade.php.
Every Livewire class must contain at least the render() method which tells your app which view to load. A Livewire component's render method gets called on the initial page load AND every subsequent component update. The Artisan command will automatically generate this method for you.
In the render method you can return a Blade view or a Blade template string, if the component is simple. In any case Make sure your Blade view only has ONE root element.
namespace App\Http\Livewire;

use Livewire\Component;

class Setup extends Component
{
    public function render()
    {
        return view('sendportal::livewire.setup');
    }
}
We can add a simple message in the LiveWire setup.blade.php view to check that its working correctly:
<h1>Hello from LiveWire</h1>And finally we can include the component in our base view using <livewire:setup /> (or you can use @livewire('setup') instead):
<div class="container">
    <div class="row justify-content-center">
        <div class="col-md-8">
            @include('sendportal::auth.partials.logo')

            <livewire:setup />
        </div>
    </div>
</div>
Thinking about state
We need to think about the state of the installer. We can take the php artisan sp:setup command as a reference to lay out what we need:
- list of steps that need to be performed; and
- the step that we're currently on; and
- which steps have been completed and which haven't.
At first sight the state looks very simple, so we can try to implement it using PHP primitives, such as arrays and integers.
Livewire components store and track data as public properties on the component class, so we can just go ahead and add them:
namespace App\Http\Livewire;

use Livewire\Component;

class Setup extends Component
{
    // index of the current active step
    public $active = 0;

    // list of steps
    public $steps = [
        ['name' => 'Environment File', 'completed' => false],
        ['name' => 'Application Key', 'completed' => false],
        ['name' => 'Application Url', 'completed' => false],
        ['name' => 'Database Connection', 'completed' => false],
        ['name' => 'Database Migrations', 'completed' => false],
        ['name' => 'Admin User Account', 'completed' => false],
    ];
}
Public properties in Livewire are automatically made available to the view, so we can already update our LiveWire view to show the data:
<div>
    <h1>Hello from LiveWire</h1>
    <span>Active Step: {{ $active }}</span>
    <ul>
        @foreach($steps as $step)
            <li>{{ $step['name'] }} - {{ $step['completed'] ? 'Done' : 'Pending' }}</li>
        @endforeach
    </ul>
</div>
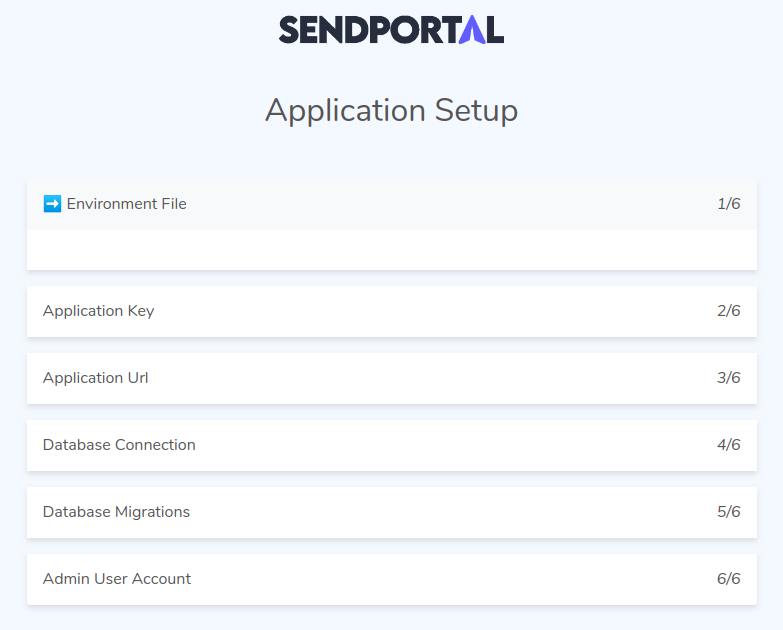
We can now start improving the UI styling. The idea is to display the setup as an accordion, where the active step is open and the others are closed. Since we're using Bootstrap 4, we can leverage the accordion classes.
<div>
    <h2 class="text-center">Application Setup</h2>
    <div class="accordion">
        @foreach ($steps as $index => $step)
            <div class="card">
                <div class="card-header p-3 {{ $step['completed']
                        ? 'bg-success text-white'
                        : ($index === $active ? 'bg-light' : null) }}">
                    <h6 class="mb-0">
                        @if ($step['completed'])
                            ✔
                        @elseif($index === $active)
                            ➡️
                        @endif
                        {{ $step['name'] }}
                        <span class="text-small float-right">
                            <em>{{ $loop->iteration }}/{{ count($steps) }}</em>
                        </span>
                    </h6>
                </div>
                @if($index === $active)
                    <div class="collapse">
                        <div class="card-body">
                            {{-- step-specific view here --}}
                        </div>
                    <div>
                @endif
            </div>
        @endforeach
    </div>
</div>
By using different CSS classes, we can determine which steps have been completed, the current step, and those that are still pending.
Its starting to look nice!
Actions
We now have to think about the actions that we want to perform in our UI:
- check if the current step has been completed
- if not, perform the action
- otherwise move to the next step
This is pretty much all the logic that our component will have to implement. However we're trying to make the Setup component as "dumb" as possible, so the actual logic of each step can be implemented by dedicated subclasses, following the Delegation pattern. This way the component will only have to manage the global state.
Ideally we want to (i) move through the steps back and forth, (ii) check() if the current step has been completed, and (iii) run() the next step. So for now we can just add the methods to the component
class Setup extends Component
{
    public function previous()
    {
        $this->active--;
    }

    public function next()
    {
        $this->active++;

        $this->check();
    }

    public function check(): bool
    {
        // check if the current step can be marked as completed
        // if it is, move to the next one
        // otherwise return false
    }

    public function run(): void
    {
        // perform the action specific to the current step
        // if it completes, move to the next step
        // otherwise, in case of error or exception, report to the ui
    }
}
Those methods can be invoked from the UI using the LiveWire wire[event]="[action]" directive. For example we can attach one of the functions to a HTML button
<button wire:click="next">Next</button>Since check() and run() will call the corresponding methods on each Step class, it's good practice to add an interface for those classes:
interface StepInterface
{
    public function run(): bool;

    public function check(): bool;
}
Now we can go ahead and create all the steps classes. Explaining the implemented logic is outside the scope of this blog post (the source is on GitHub, if you are curious), but here's a brief recap of what they do:
| Class | Check | Run |
|---|---|---|
Env |
The .env file exists |
Create it using the .env.example file |
Key |
The application key has been set | Set the application key |
Url |
The application url is different than http://localhost |
Prompt the user for the desired application url |
Database |
Verifies the connection to the Database | Prompt the user for valid Database connection parameters |
Migrations |
Verifies if there are any pending migrations | Run the migrations |
Admin |
Verifies if a user already exists | Prompt the user for the credentials of the first account of Sendportal |
So how do we bind the check() and run() methods of each Step to the Setup class?
First of all let's add the related class to each step in our initial array:
public $steps = [
    ['name' => 'Environment File', 'completed' => false, 'handler' => Env::class],
    ['name' => 'Application Key', 'completed' => false, 'handler' => Key::class],
    ['name' => 'Application Url', 'completed' => false, 'handler' => Url::class],
    ['name' => 'Database Connection', 'completed' => false, 'handler' => Database::class],
    ['name' => 'Database Migrations', 'completed' => false, 'handler' => Migrations::class],
    ['name' => 'Admin User Account', 'completed' => false, 'handler' => Admin::class],
];
Then, from the Setup class itself we can invoke the methods:
public function check(): bool
{
    $step = $this->steps[$this->active];

    $handler = app()->make($step['handler']);

    $completed = $handler->check();

    $this->steps[$this->active]['completed'] = $completed;

    return $completed;
}

public function run(?array $data): void
{
    $step = $this->steps[$this->active];

    $handler = app()->make($step['handler']);

    $completed = $handler->run($data);

    $this->steps[$this->active]['completed'] = $completed;
}
Both functions are very similar. As you can see, we are creating a new instance of the handler class that corresponds to the current Step and we run the corresponding method on it. The Setup component doesn't have any knowledge of the logic of each step, as long as the function signature is respected. Another benefit is that testing gets easier.
Isolating the views
Following the same logic we also want to isolate the views of each step such as they don't have to depend from the LiveWire Setup component. In other words we don't want to reference any step-specific UI inside the setup.blade.php view, for example using an if statement or a switch - that would get messy really quickly!
Initially we tried to isolate each view inside a LiveWire nested component, but that turned out to be difficult because one of the limitations of nested components is that:
"Nested components CAN accept data parameters from their parents, HOWEVER they are not reactive like props from a Vue component."
The solution however was already there: we ended up creating a Blade partial for each Step class.
We also updated each step to hold a static reference to the view.
class Env implements StepInterface
{
    const VIEW = 'sendportal::setup.steps.env';

    ...
}
We therefore changed the list of steps to look like the following:
public $steps = [
    ['name' => 'Environment File', 'completed' => false, 'handler' => Env::class, 'view' => Env::VIEW],
    ['name' => 'Application Key', 'completed' => false, 'handler' => Key::class, 'view' => Key::VIEW],
    ['name' => 'Application Url', 'completed' => false, 'handler' => Url::class, 'view' => Url::VIEW],
    ['name' => 'Database Connection', 'completed' => false, 'handler' => Database::class, 'view' => Database::VIEW],
    ['name' => 'Database Migrations', 'completed' => false, 'handler' => Migrations::class, 'view' => Migrations::VIEW],
    ['name' => 'Admin User Account', 'completed' => false, 'handler' => Admin::class, 'view' => Admin::VIEW],
];
We also changed the setup.blade.php to remove any reference to specific steps:
<div>
    <h2 class="text-center">Application Setup</h2>
    <div class="accordion">
        @foreach ($steps as $index => $step)
            <div class="card">
                @include($step['view'], [
                    'step' => $step,
                    'active' => $index === $active,
                    'iteration' => $loop->iteration,
                    'total' => count($steps)
                ])
            </div>
        @endforeach
        </div>
    </div>
</div>
Finally, let's take a look at the UI specific to the Env class, so you can have a better understanding at the structure of each view the check() and run() actions are called using the wire:click directive
<div class="card-header p-3 {{ $step['completed'] ? 'bg-success text-white' : ($active ? 'bg-light' : null) }}">
    <h6 class="mb-0">
        {{ $step['completed'] ? '✔' : ($active ? '➡️' : null) }} {{ $step['name'] }}
        <span class="text-small float-right"><em>{{ $iteration }}/{{ $total }}</em></span>
    </h6>
</div>
<div class="collapse {{ $active ? 'show' : null }}">
    <div class="card-body">
        @if ($step['completed'])
            <p>✔️ <code>.env</code> file already exists</p>
            <button class="btn btn-primary btn-md" wire:click="next">Next</button>
        @else
            <p>The .env file does not yet exist. Would you like to create it now?</p>
            <button class="btn btn-primary btn-md" wire:click="run">
                Run
            </button>
        @endif
    </div>
</div>
We can see the Env step in action here:
Check the initial state
When the page loads for the first time it's obvious that the completed value of the first step is false because we still have to run the check() method. Therefore we want to be able to call it as soon as possible, perhaps before the component is even rendered, so we don't waste a server round-trip.
Luckily LiveWire offers a few lifecycle hooks, which are pretty similar to those available in Vue.
We can make use of the mount hook and run the first check() immediately after the component is instantiated.
public function mount(): void
{
    $this->check();
}
There is another small detail that we also have to take into account. Let's say, for example, that the environment has already been configured manually, and the only missing steps are the database migrations and the user account - we ideally want to jump straight to the next pending step.
With the current code, if we refresh the component we will start from the beginning. We can easily fix this by calling check() recursively, up to the first step that returns false or to the last step:
public function check(): bool
{
    $step = $this->steps[$this->active];

    $handler = app()->make($step['handler']);

    $completed = $handler->check();

    $this->steps[$this->active]['completed'] = $completed;

    if ($completed and $this->active < count($this->steps) - 1) {
        $this->next();
    }

    return $completed;
}
The same goes for the run() method, so we don't have to click Next in order to move to the next step:
public function run(?array $data): void
{
    $step = $this->steps[$this->active];

    $handler = app()->make($step['handler']);

    $completed = $handler->run($data);

    $this->steps[$this->active]['completed'] = $completed;

    if ($completed and $this->active < count($this->steps) - 1) {
        $this->next();
    }
}
Handle form submission
Now let's take a look at how we can accept form submissions from the user.
In LiveWire you can bind public properties of the LiveWire component to the values of HTML input elements, so that they are synchronized. So when the value changes in the frontend, the change is also reflected in the backend and vice-versa. This is called two-way data binding and anyone that has worked with any frontend framework (from Knockout to Vue or Angular) should already be very familiar with it.
However, since our views are dynamic and the logic is delegated to Step subclasses we decided to check if it was possible to achieve the same result without having to bind form fields to LiveWire properties. In the end we are not interested in sending an AJAX request every time the values change. Two-way data binding doesn't make a lot of sense in this case because we are only interested in those values once the form has been submitted.
For example, let's take the form that accepts the application url. It looks like the following:
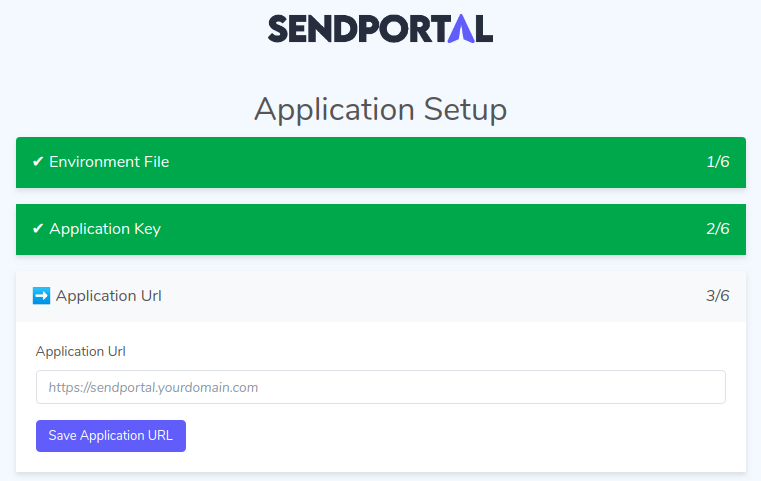
and it's coded like this:
<div class="card-body">
    @if ($step['completed'])
        <p>✔️ The Application url is set to {{ config('app.url') }}</p>
        <button class="btn btn-primary btn-md" wire:click="next">Next</button>
    @else
        <form>
            <div class="form-group">
                <label for="url">Application Url</label>
                <input type="text" class="form-control" id="url" name="url" placeholder="www.sendportal.io">
            </div>
            <button class="btn btn-primary btn-md" type="submit">Save Application URL</button>
        </form>
    @endif
</div>
How can we send the content of the form to the backend without binding the url input?
Luckily, there was already someone with the same needs and Caleb was kind enough to provide a solution that perfectly fits our requirements.
Using modern JavaScript APIs like FormData and Object.fromEntries we are actually able to send the content of the form by passing it as a parameter to the run() function using the wire:submit event.
<form wire:submit.prevent="run(Object.fromEntries(new FormData($event.target)))">
    <div class="form-group">
        <label for="url">Application Url</label>
        <input type="text" class="form-control" id="url" name="url" placeholder="https://sendportal.io">
    </div>
    <button class="btn btn-primary btn-md" type="submit">Save Application URL</button>
</form>
$event.target is a reference to the object onto which the event was dispatched, which is the form itself.
We are also using the prevent event modifier to prevent the default operation of the form.
Finally the only thing that's left is changing the signature of the run() method to allow optional input data as first parameter
public function run(?array $data): void
{
    $step = $this->steps[$this->active];

    $handler = app()->make($step['handler']);

    $completed = $handler->run($data);

    $this->steps[$this->active]['completed'] = $completed;

    if ($completed and $this->active < count($this->steps) - 1) {
        $this->next();
    }
}
Validation
LiveWire supports validation out of the box. For this reason adding a validation layer to the Setup component is a trivial task.
Just like we did with the previous methods, we can delegate the validation to each Step subclass. For example let's see the validate function of the Url class. You will notice that this is plain Laravel code that leverages the Validator:
public function validate(array $input = []): array
{
    $validationRules = [
        'url' => ['required', 'url']
    ];

    $validator = Validator::make($input, $validationRules);

    return $validator->validate();
}
In the Setup component we can check if the current Step class has a validate method and call it if it exists:
public function run(?array $data): void
{
    // clear any previous error
    $this->resetValidation();

    $step = $this->steps[$this->active];

    $handler = app()->make($step['handler']);

    if (method_exists($handler, 'validate')) {
        $data = $handler->validate($data);
    }

    $completed = $handler->run($data);

    $this->steps[$this->active]['completed'] = $completed;

    if ($completed and $this->active < count($this->steps) - 1) {
        $this->next();
    }
}
If the validation does not pass, the line $handler->validate($data) will throw a new ValidationException. LiveWire will then catch it and populate the Laravel $errors object so we can actually display the errors in the view:
<div class="form-group">
    <label for="url">Application Url</label>
    <input type="text" class="form-control" id="url" name="url" placeholder="https://sendportal.yourdomain.com">
    @error('url') <span class="form-text text-danger">{{ $message }}</span> @enderror
</div>
It's important to acknowledge that there's a little gotcha here. This GIF explains it perfectly
As you can see the old data disappears entirely from the form. This is due to the fact that we're not binding the input to a public property of the component; as far as LiveWire is concerned, that data doesn't exist when it sends the diffed HTML back to the client.
This is not really a big issue, because we can just flash the old data ourselves:
public function run(?array $data): void
{
    ...

    if (method_exists($handler, 'validate')) {
        try {
            $data = $handler->validate($data);
        } catch (ValidationException $e) {
            session()->flashInput($data);

            throw $e;
        }
    }
}
We also make sure to catch the ValidationException and then throw it again, after we flashed the old input to the session. This means that we can use the good old old method (pardon the pun here 😅) to retrieve the old input:
<div class="form-group">
    <label for="url">Application Url</label>
    <input type="url" class="form-control" id="url" name="url" placeholder="https://sendportal.yourdomain.com" value="{{ old('url') }}" required>
    @error('url') <span class="form-text text-danger">{{ $message }}</span> @enderror
</div>
We can also leverage the HTML5 client validation by changing the input type to url and adding the required attribute, so we can let the browser handle the validation.
UI Niceties
The installer is finally taking form. We can now add some UI niceties to make the overall experience even more satisfying.
Add a spinner
Livewire allows you to easily display loading states during a roundtrip to the server, which is always a good indicator to the user that something is actually happening.
Using the wire:loading directive we can show specific HTML only while waiting for actions to complete (network requests). Let's add a spinner to the setup.blade.php view.
<div wire:loading>
    <div class="spinner-border" role="status">
        <span class="sr-only">Loading...</span>
    </div>
</div>
The spinner is particularly important on the Migrations step, which can take more time to complete:
We can also use the wire:loading.attr directive to disable the submit button during the server roundtrip, so the user doesn't accidentally submit the form multiple times:
<button class="btn btn-primary btn-md" type="submit" wire:loading.attr="disabled">Add a progress bar
An installer is not really complete if it lacks a progress bar. Thanks to LiveWire, implementing a progress bar is straightforward.
We already have all the necessary information: the current step and the total number of steps. We only have to compute a value in the [0 - 100] interval, so we can map the progress to a percentage value.
Just like VueJs and other frontend frameworks, LiveWire offers an API for dynamic properties, also known as Computed Properties. We can use this API to compute the percentage value from the current step, the number of completed steps and the total number of steps.
public function getProgressProperty()
{
    $completed = array_reduce($this->steps, function ($carry, $step) {
        return $carry + ($step['completed'] ? 1 : 0);
    }, 0);

    return (100 / count($this->steps)) * ($completed);
}
Finally we can use this value to set the width of our Bootstrap progress bar.
<div class="progress mb-2" style="height: 8px">
    <div class="progress-bar" role="progressbar" style="width: {{ $this->progress }}%"></div>
</div>
You may have noticed that, unlike public properties, computed properties have to be referenced with the $this keyword.
Show the final message
We can also use the progress computed property to show a success message at the end of the process.
@if($this->progress == 100)
    <div class="text-center">
        <h2 class="text-primary">Application Setup Complete</h2>
        <a href="{{ route('login') }}" class="btn btn-primary btn-md">Login</a>
    </div>
@endif
The Final Cut
Wizards, by their nature, can be somewhat complicated beasts. At the end of this process we learned that LiveWire is powerful and it definitely has its own space in the Laravel ecosystem.
By using Laravel Livewire, we were able to implement a relatively complex and responsive UI, whilst still keeping the code modular and maintainable. Adding another step to the wizard, for example, would be really easy. All without writing a single line of JavaScript.